By Rekha (Entry #2)
Few months back I was looking for some easy ideas to store all my rings in one place.

Few months back I was looking for some easy ideas to store all my rings in one place.
All I wanted was an easy to clean covered storage, where I can keep my rings separately so that it becomes easy to pick and choose whenever I’m in a hurry 😀
The Online stores had ring boxes but they were all too small and quite costly. Not that I wouldn’t spend on a good storage solution but these boxes they sold were not worth the money 🙁 So after a lot of search I finally decided to make a ring holder box myself referring few YouTube videos and Google image ideas 🙂
So this is how it turned out to be 🙂


I am so happy now since I can customize it per my convenience and requirement and they cost absolutely nothing 😀 Isn’t it awesome guys 🙂
Ok now let’s start the DIY tutorial on how to make a ring holder box using the products available at our household 🙂
Things Needed:
1. A Cloth, you can choose either a single color or multicolored ones based on your taste and availability. Here I have chosen a single colored cloth. It was actually an old skirt of a 5 year old 😛 (Uncle’s daughter :)). Try to use a thick fabric and not a satiny one as it should stay put inside the box.

2. Any old box based on your rings collection. You can even use a sweets box. Here I have used a box that I got for my jewelry purchase online 🙂

3. A sharp scissor
4. Fabric Glue (I’ve used a Fevicryl one here) or a Fevicol
5. Scale/Ruler
6. Marker

Procedure:
STEP-01: Using the scale, measure the inner length of the box. Now take that as an approximate measurement, add a buffer margin on both the sides and use that as the width of the cloth bed. For instance if the inner length is 12.5 cms as shown in the picture, keep approx 1.5 cms buffer margin on both the sides and this will be the width of your cloth bed.


Now measure the side width of the box, for instance in our case we have got 3.5 cms inner width hence we need to subtract half a cm from the total and use 3 cms to measure the cloth. We are doing this because we need the cloth to fit inside the box perfectly.


Now the length of the cloth piece is decided by the width of the box. Once you get your measurements as calculated above, multiply it by 6 and that will be the length of your cloth bed. (Note: the multiply number depends on the cloth bed thickness you wish to have, the cloth bed should be neither thick nor thin)
Using a marker pen make a mark at every 3 cms throughout the length of the cloth. This will help us in folding the cloth accurately in order to make the cloth beds and fill the box

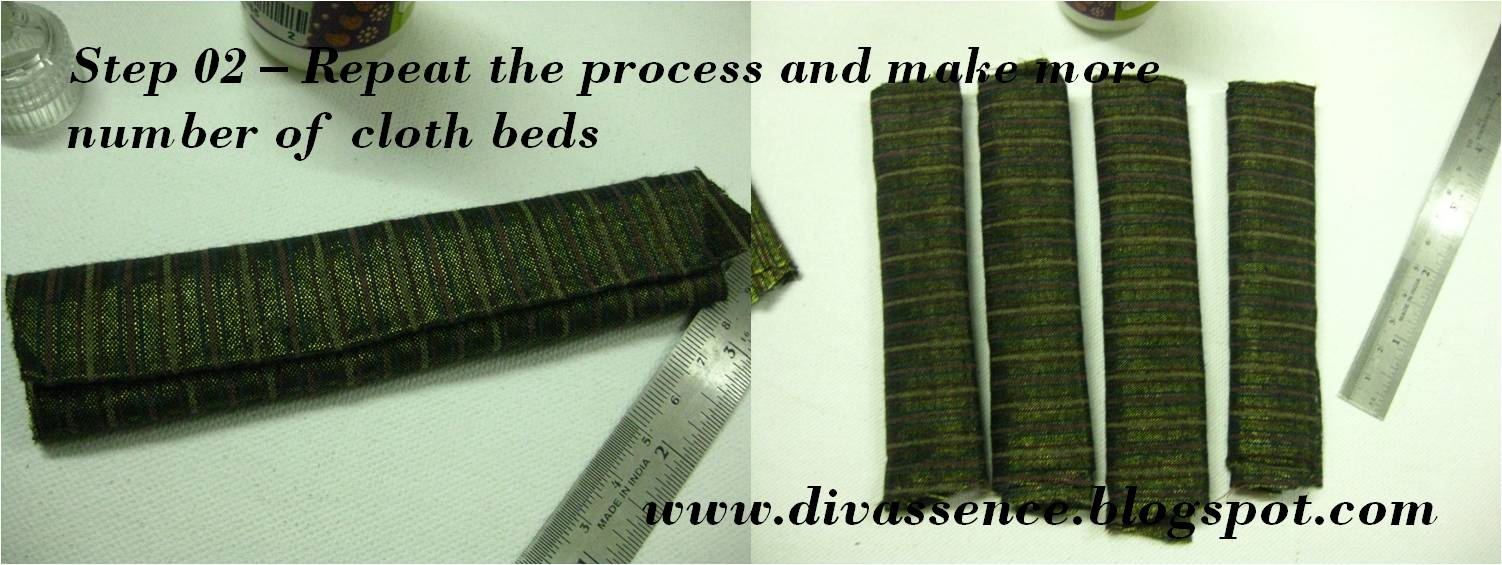
STEP02: To make a cloth bed, follow the marks and start folding the cloth as shown below. You will be folding it about 5 times approx.


Now use a fabric glue or fevicol and stick the end of the cloth firmly.

Before sticking the ends, try to fit the cloth inside the box, if you feel that the size is more or less you can adjust it accordingly. Remember this will work only on trial and error basis 😀 so you need to have a lot of patience 🙂
STEP03: Once you are good with the first cloth bed, repeat the process (STEP02) and make 15 to 20 cloth beds based on the size of your box.

The cloth beds need to be fitted and filled inside the box tightly. Remember your rings will be placed in between 2 cloth beds as shown in the picture. So keep that in mind and fill the cloth beds inside the box.


That’s it guys 😀 the main part is over 😀 you can now start placing your rings in between the cloth beds as shown below.


In the below pic I have turned the box upside down but still you can see the rings are placed intact. This is possible only because of the tight fitted cloth beds. So this will give you an idea of how tightly we need to fit the cloth beds inside the box 😀

STEP04: This step is optional; I decorated the box cover by covering it with the same piece of cloth. Again you can use the same color or a different color. In this case I have used the same color cloth.

I’ve also added some quilled paper flowers , buds and leaves to enhance the appearance of the box 🙂 You can either stick few charms, stones, plastic flowers or anything that you love to add a little jazz to the box 😀


That’s it guys, hope you all found this tutorial useful. Though the whole process here seems to be little lengthy (scary :P) trust me, it will not take more than 30 mins if you have all the materials ready 🙂
Do let me know if you have any doubts and if you make one please share the picture with us :)We would love to see your creativity 😀
Take care and Thanks for reading 🙂
Space-wise is a new segment on Divassence! where we’ll showcase some of the best storage ideas! If you have any ideas do mail us at divassence(at)gmail(dot)com